
Share Bar for Jekyll without using Javascript!
,
Reducing the use of JavaScript results in a faster loading speed. Here is a guide on how to add a social share bar to Jekyll blog. You can copy paste the code and it should work! Many Jekyll themes do not offer a good share bar. So I thought of making one for myself!
Why share bar for Jekyll blog?
If you read a lot over the internet then you know how hard it is to share an article with your friend if it doesn’t have a share button. You have to copy the link from the address bar, go to your email account, type every single detail and send it. Same thing follows for sharing on social media websites.
- Why share bar for Jekyll blog?
- How to add a social media share bar?
- Making a social media share bar without JavaScript
- Basics before we dive in
- How to implement WebJeda share bar?
- Add style to your share bar
It is a good idea to have share buttons at the end of an article. Users may not be willing to copy paste the link but hitting a button is easy! More share is equal to more eyeballs on your article. Shares will drive traffic to your website and sometimes it may go viral. So it is necessary to provide an option to share.
How to add a social media share bar?
Adding a share bar is really easy using services like ShareThis or AddtoAny. They are good. They provide decent buttons with share count. This is what I recommend if you just want a share bar and you don’t care about your website loading speed. I have used ShareThis before and the problem was that it loads a lot of JavaScript files which will slow down the website.
I can always defer javascript loading but, the files that are loaded by ShareThis are from a remote server. So I don’t even have that option. Then I thought of saving the remote JavaScript files into my local directory and call it from there! That didn’t work out very well as there were session variables used and they started to throw Js errors.
Now I had to make a decision whether to use it or make one for myself. I thought why not make one! I will have the complete design control. So this is how I designed a share bar for my Jekyll blog.
Making a social media share bar without JavaScript
When I decided to make a share bar for my Jekyll blog WebJeda, I thought of making it javaScript free. As a developer - for a fast performing website - you should avoid JavaScript as much as possible and also lower the number of http requests. With ShareThis, I used to have 5 to 6 JavaScript files being loaded from a remote server and 22 requests were made. This happens when you have many buttons and every button is downloaded remotely!
Once I installed my css-only share bar, the request number dropped to 11! That was a huge improvement! But it comes at a cost. I cannot see the number of shares anymore. I can always write a code myself to calculate the number of shares based on click event but that will be in the future. For now, I’m happy that I have a beautiful share bar which is made only with html and css. You can see it in the screenshot.
Basics before we dive in
When I was preparing this share bar, I was facing problems with sharing the page I’m currently browsing. Let’s say you are in the page article-1, the facebook share link should look like https://www.facebook.com/sharer/sharer.php?u=http://blog.webjeda.com/article-1/. And if you are in the page article-2, then it should change to https://www.facebook.com/sharer/sharer.php?u=http://blog.webjeda.com/article-2/.
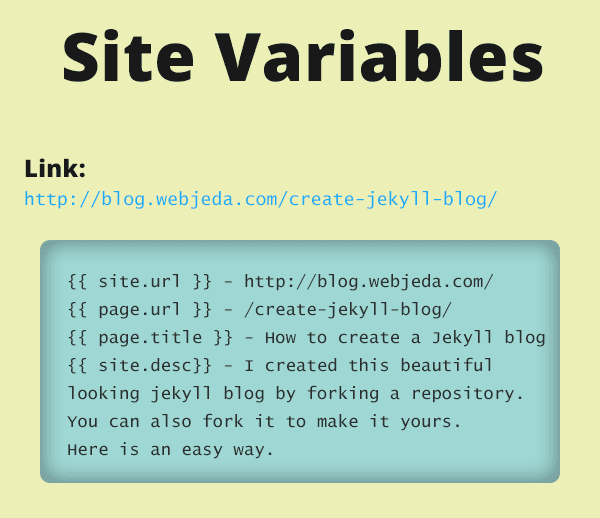
But how to make this change of URL for every page. One way was to use window.location() but that is again JavaScript which I’m trying to avoid. Then I realized that I can use Site Variables - the {{ stuff }} inside double curly braces!
Here is an image explaining site variables for the link How to create a Jekyll blog. You can check the site description by viewing the source. These variables are mentioned inside _config.yml file.
See all the variables here
Then I changed the facebook share link to the following which works for all pages!
https://www.facebook.com/sharer/sharer.php?u={{ site.url }}{{ page.url }}
How cool is that!
I can do the same thing for twitter share link
https://twitter.com/home?status={{ site.url }}{{ page.url }}
This works pretty much on all the social media websites. For LinkedIn, I also added title and description of the page.
https://www.linkedin.com/shareArticle?mini=true&url={{ site.url }}{{ page.url }}&title={{ page.title }}&summary={{ page.description }}&source=webjeda
This is the key to my WebJeda Sharebar.
How to implement WebJeda share bar?
Create a new html file inside _includes folder and call it share.html. Copy paste this code.
<link rel="stylesheet" href="https://maxcdn.bootstrapcdn.com/font-awesome/4.5.0/css/font-awesome.min.css">
<h3>Share this:</h3>
<div id="share-box">
<a href="https://www.facebook.com/sharer/sharer.php?u={{ site.url }}{{ page.url }}" onclick="window.open(this.href, 'mywin',
'left=20,top=20,width=500,height=500,toolbar=1,resizable=0'); return false;" ><i class="fa fa-facebook-official fa share-button"> facebook</i></a>
<a href="https://twitter.com/intent/tweet?text={{ page.title }}&url={{ site.url }}{{ page.url }}" onclick="window.open(this.href, 'mywin',
'left=20,top=20,width=500,height=500,toolbar=1,resizable=0'); return false;"><i class="fa fa-twitter fa share-button"> twitter</i></a>
<a href="https://plus.google.com/share?url={{ site.url }}{{ page.url }}" onclick="window.open(this.href, 'mywin',
'left=20,top=20,width=500,height=500,toolbar=1,resizable=0'); return false;" ><i class="fa fa-google-plus fa share-button"> google</i></a>
<a href="http://www.reddit.com/submit?url={{ site.url }}{{ page.url }}" onclick="window.open(this.href, 'mywin',
'left=20,top=20,width=900,height=500,toolbar=1,resizable=0'); return false;" ><i class="fa fa-reddit fa share-button"> reddit</i></a>
<a href="https://www.linkedin.com/shareArticle?mini=true&url={{ site.url }}{{ page.url }}&title={{ page.title }}&summary={{ page.description }}&source=webjeda" onclick="window.open(this.href, 'mywin',
'left=20,top=20,width=500,height=500,toolbar=1,resizable=0'); return false;" ><i class="fa fa-linkedin fa share-button"> linkedin</i></a>
<a href="mailto:?subject={{ page.title }}&body=Check out this site {{ site.url }}{{ page.url }}"><i class="fa fa-envelope fa share-button"> email</i></a>
</div>I have used icons from font awesome which is better idea than loading icons from local files.
Now copy this line inside your post layout file which will be inside the _layouts folder. You have to place this line wherever you want the share bar to appear on your posts.
{% include share.html %}Add style to your share bar
I have styled the buttons with the following css. You can change it for your needs.
.share-button {
    margin: 0px;
    border: 1px solid #D3D6D2;
    padding: 5px 10px 5px 10px;
    opacity: 0.9;
}
.share-button:hover {
    opacity: 1;
}

.fa-facebook-official {
    color: #3b5998;
}
.fa-google-plus {
    color: #d34836;
}

.fa-linkedin {
    color: #0077b5;
}
.fa-envelop {
    color: #444444;
}
.fa-reddit {
    color: #ff5700;
}

.fa-twitter {
    color: #4099FF;
}
Currently, I’m using this share bar for my blog. You will see a share bar at the end of this article, which uses the same code.

So this is how you can implement css-only and JavaScript free WebJeda share bar. If you were able to implement this on your blog then please leave a link in the comment.
Thanks for reading!
