
SSL certificate (https) for Jekyll
, for Jekyll")
Https has an advantage in SEO over http. It is easy to set up SSL for Jekyll using CloudFlare. Learn how to get a free SSL certificate for your Jekyll blog. Also, find out the advantages and disadvantages of using SSL on your website.
Why should anyone use SSL?
SSL (Secure Socket Layer) basically provides a secure connection between the client(web browser) and server(website). It avoids eavesdropping, man-in-the-middle attack etc., Bottom line is - A user can browse your website without worrying about someone stealing personal information.
- Why should anyone use SSL?
- Why I’m not using SSL on this Jekyll blog?
- How to get SSL on Jekyll?
- SSL on custom domain
On August 06 2014 Google announced that https will be considered for ranking signal. They took this measure to keep everybody safe over the web. So using SSL can improve your website ranking. And also, users will trust the product or service you provide on your website.
Why I’m not using SSL on this Jekyll blog?

I’m using SSL on Nallikayi Articles but not on other websites. Why did I do so? If SSL is good for SEO, why didn’t I use it on all my websites? Especially, why didn’t I use it on this blog?! The reasons are as follows,
Adsense
I use Adsense for monetizing this blog. If I were to secure this blog with SSL, I should not request any data from a http server. Everything should be https! But, most of the ads on Adsense are from a http source which is not acceptable for an SSL certified website.
Google detects whether your website has SSL certificate or not and serves ads accordingly. If I activate SSL in my Jekyll blog, Google will filter only https ads and serve it on my website. This way I may miss some high paying ads.
Performance
Website loading speed is my main concern. I want it to be fast; really fast. Activating SSL would slow down my Jekyll blog a little due to TLS handshaking which is a process that the browser and server follow to decide how to communicate and create the secured connection.
Google also announced that they were using page load time as a factor in search engine rankings. SSL and page-load time conflict with each other. Anyway, the load time is a little more than what it used to be. So if speed is not your priority then you can always go ahead and use SSL.
How to get SSL on Jekyll?
If your website or Jekyll blog URL is in the format username.github.io then you can use https right away just by enforcing it. But before you do that, verify if https://username.github.io renders the same thing and you see a green padlock before the URL.
If it works but you do not see a green padlock then the reason must be that your website is requesting something from a non-secure (http) server. Read warning to solve this.
Enforce https
Use this JavaScript code at the top of your website to redirect to https. Change username to your GitHub username.
var host = "username.github.io";
if ((host == window.location.host) && (window.location.protocol != "https:"))
    window.location.protocol = "https";
Change Canonical URL to https
You should let search engines read your content only in https site. Use canonical URL in the head section.
<link rel="canonical" href="https://username.github.io" />for Jekyll, it should be
<link rel="canonical" href="{{ site.url }}{{ page.url }}" />Make sure url is https in _config.yml. Also use enforce_ssl parameter.
url: https://username.github.io
enforce_ssl: username.github.io
This way, there will be no trace of your http website anywhere on the internet even though it works.
SSL on custom domain
If you are using a custom domain, say yoursite.com then you may have to use a different approach. If enforcing works then great! Otherwise follow the procedure given below.
Step 1: Migrate DNS to CloudFlare
CloudFlare is a CDN service which offers pretty decent service on free account. I’m using CloudFlare for all my websites. CDN provides local copies of the website through a nearby server so that there is no delay in website loading.
It also has other advantages like handling DNS, analytics, providing SSL certificate - flexible and paid, firewall, speed optimization, caching etc., Watch the video on their website to know how it works. And it doesn’t matter where you have bought your domain and where you are hosting your website.
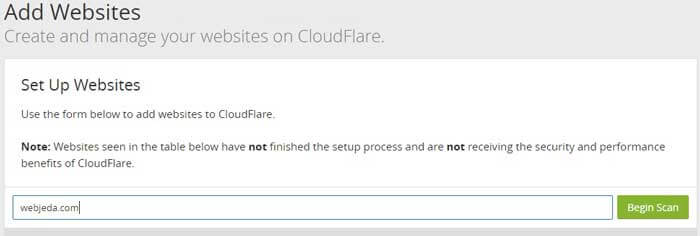
Among these, we are concentrating only on DNS handling. So before we begin to create an account in CloudFlare. Now select Add site option. Now enter your domain and click on Begin scan.
Once the scanning is done, click on Continue to setup where you will see an option to verify all your DNS records. You don’t have to change anything here. click on Continue.
Now select a package that suits your requirement. I would suggest you to try the free version first and then upgrade if you like their service.
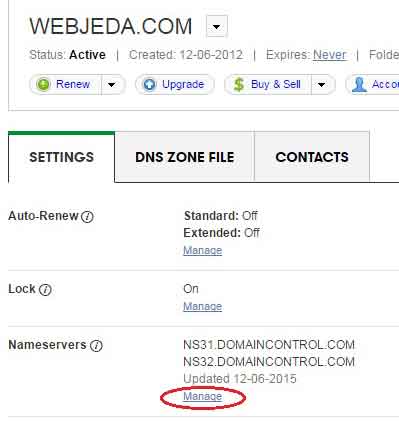
Now is the crucial part. You have to change the name servers (NS31.DOMAINCONTROL.COM) in your domain registrar to the following or whichever is provided to you by CloudFlare.
dan.ns.cloudflare.com

may.ns.cloudflare.com
You have to login to your domain registrar and add these custom name servers. Once it is done, click on Continue. It may take a while to reflect the changes but once it is successfully done, you will see a Status: Active message on CloudFlare.
Step 2: Use ‘Flexible SSL’
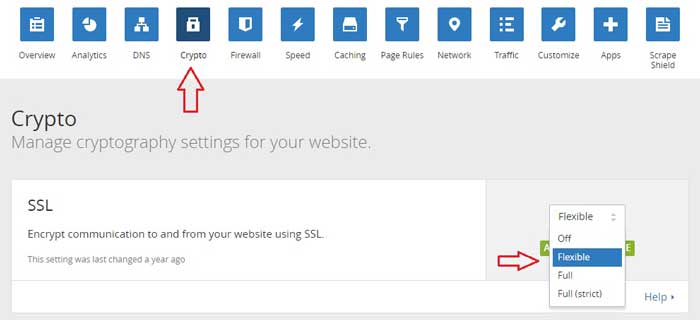
Now navigate to Crypto option in CloudFlare. You should see an option called SSL. In the drop-down menu select Flexible. This is all the changes we need to do in the server end.
Step 3: Changes to be made in the blog
As I mentioned earlier now your website is ready for SSL. Check again if the https link is working(all pages of the website). If not troubleshoot using the warning.
Follow the enforcing procedure.
Use this JavaScript at the top of the default template. Replace yoursite with your domain name.
var host = "yoursite.com";
if ((host == window.location.host) && (window.location.protocol != "https:"))
   window.location.protocol = "https";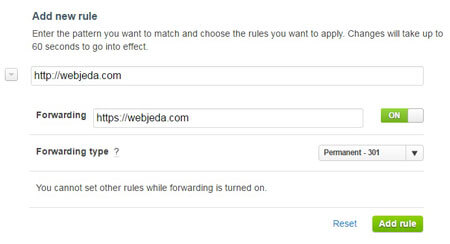
If you do not want to use JavaScript on your website then you can set page rules in CloudFlare so that it redirects your website to https.
Use canonical URL in the head section to let search engines know that you are using https.
<link rel="canonical" href="{{ site.url }}{{ page.url }}" />Make sure url is https in _config.yml and use enforce_ssl parameter
url: https://yoursite.com
enforce_ssl: yoursite.com
Flexible SSL is not the complete solution for security since it is provided by ClouFlare. If someone can hack into CloudFlare then they can steal information from your users! Since we are using it for SEO ranking, we are good.
If you are looking for complete security then you can buy SSL certificate for your website.
Warning
All the resources that are requested by a ssl activated website should also be secured. That is, if you request any file with a http link then the green padlock will not appear. In order to avoid that use relative url. For example, instead of http://webjeda.css use //webjeda.css
I hope that helped you set up SSL on your website. Ask any doubts you have through comments. Do not forget to subscribe.
Thanks for reading!
