
The easiest search option for Jekyll
,
A robust search bar can be installed for a Jekyll site using many ways. But I’m discussing the easiest one here. We are using Google’s custom search engine which doesn’t add any overhead to our website.
Why do we need a search option?
Having a search bar in your Jekyll blog helps users to find the data using keywords. You may think that having an archive page would suffice but it is not enough. For example, if a user of my blog wants to know how to setup CloudFlare with his website. He will not find anything remotely close in my archive page but if he types CloudFlare in the search page then he will get SSL certificate (https) for Jekyll as the first result. I have mentioned the required steps inside that post.
This is just an example in the case of a blog. Websites can be of different kinds. Sometimes websites may offer location search, image search or any type of media search. The search bar is like a personal search engine for the website.
- Why do we need a search option?
- How to implement a search bar on Jekyll
- Installing Google custom search on Jekyll
- Conclusion
How to implement a search bar on Jekyll
As per the title, I should be discussing the easiest one but I will introduce other search options as well. You may be expecting a search engine with instant results or auto complete capability. That depends on the website. It is good if a website with location search bar has an auto-complete option because users may enter all kinds of spelling mistakes. Auto-complete avoids all those mistakes from happening.
So without further due let’s get into the types.
Lunr.js (free) - Demo
Tapirgo (free) - Demo
Swiftype (paid) - Demo
Google CSE (free) - Demo
All are good and may fulfill most of your ‘search’ needs. But installation is a little tricky for some of them. You may have to include a JavaScript file, create a JSON file, style your own search box etc.
Google Custom Search Engine has the least number of steps. Also, it doesn’t add any overhead to your server as google handles everything from its end. It is more like a google search result on your website but only with your site-links in the search result.

Installing Google custom search on Jekyll
Create a custom search engine
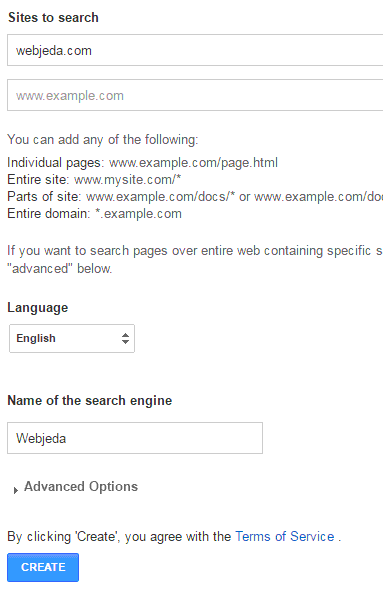
You will need a Gmail account for this. Login and go to Google CSE. Fill up the necessary fields and click on Create.
The best part here is that it allows us to add more websites! If you have a bunch of websites then you can add them all to the Google CSE. When a user searches for a keyword, CSE will look for pages in all the websites and show results from them.
If you have many subdomains then use *.yourdomain.com which will include all the subdomains. And as usual, read the complete Terms of Service before hitting create :)
Get code
Once you create a custom search engine, click on Get code. You should see a code block like this. This is your search bar.
<script>
  (function() {
    var cx = '000124122121016203706:yoijr22b2m8';
    var gcse = document.createElement('script');
    gcse.type = 'text/javascript';
    gcse.async = true;
    gcse.src = 'https://cse.google.com/cse.js?cx=' + cx;
    var s = document.getElementsByTagName('script')[0];
    s.parentNode.insertBefore(gcse, s);
  })();
</script>
<gcse:search></gcse:search>
Paste the code in your website
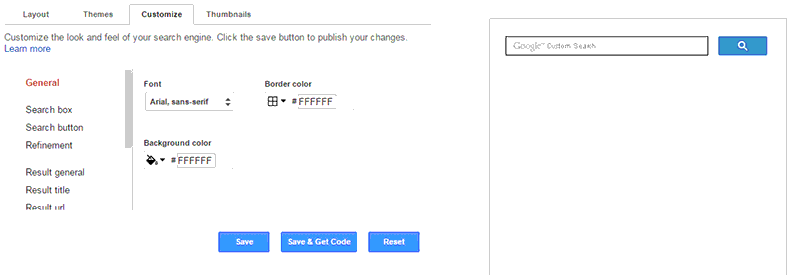
Copy the code and paste it wherever you want the search bar to appear. You can customize the look and feel of the search bar as well as the layout for search results.
That was simple, isn’t it? I’m using Google custom search engine on my Jekyll blog because even the famous moz.com is using it. I’m not sure if it is helpful for SEO but I’m pretty happy with it.
The search results look very much like google search results but you can customize it however you want to. I like the feature where the search result shows a small thumbnail along with title and description.
With an approved AdSense account, you can also earn when someone uses your custom search engine. If you look at the first screenshot, you will notice that the first result is from CloudFlare. It is an ad!
Another advantage is that the users will feel comfortable using it because it is so much like Google search. When I was new to web designing I used to think that the website owners have some kind of tie up with Google and so Google has offered them a personal search!
Though Google has an option to design your own custom search bar, you can further change the look of the search bar using some CSS. One thing I wanted was to remove the default Google logo on Google CSE search bar. I don’t think it is legal to do so. But I will keep it this way until google tells me not to. So if you want a cleaner and blank search bar then find its id and classes of your search-bar <input> tag and use this CSS
input#gsc-i-id1.gsc-input {
    background: none !important;
}
Check out my Jekyll blog’s search page. I haven’t enabled auto-complete yet. I will do it once I have enough content. There is a reason why I have search bar in a different page instead of having it on all the pages. I do not want one extra script loading on all of my pages. Users who actually use search will find it somehow but for a user who’s on my website for one little thing shouldn’t feel that the site loads very slow. So Google CSE script loads only on my Search page.
There is a significant delay in loading the script. Maybe because it loads all the assets through the script. So whenever someone visited the search page, they used to see nothing initially. Then after a second or two, the search bar would appear. This time-frame is crucial. many users may leave right after they see a blank page. I had to keep them waiting.
A good way to tackle this problem is by asking them to wait! I made some changes to the code in my Jekyll blog so that when the search bar is still downloading its assets, I will show a message saying “Loading… please wait” or something similar and when the search bar loads, the message goes away.
<script>
  (function() {
    var cx = '000124122121016203706:yoijr22b2m8';
    var gcse = document.createElement('script');
    gcse.type = 'text/javascript';
    gcse.async = true;
    gcse.src = 'https://cse.google.com/cse.js?cx=' + cx;
    var s = document.getElementsByTagName('script')[0];
    s.parentNode.insertBefore(gcse, s);
  })();
</script>
<gcse:search>Loading. . Please wait</gcse:search>
That is it!
I prefer showing results on the same page below the search bar just how google does it. You have many options on how to show the search results. Most WordPress bloggers use layover layout as it shows results on a pop-up kind of layout which doesn’t make any change to the website layout. You can also have a search bar on the sidebar and results on the main page. Choose the one that suits your needs.
What I find lacking in Google CSE is instant search. Let’s hope google does that for us. Then it won’t be any less than lunrjs search option.
Conclusion
Google CSE is a wise choice for those who want a simple robust and clean search option with no extra script loading on their website(if they’re are using it on a new page). I suggest this search for bloggers who are new to Jekyll or web designing in particular.
Let me know if you face any issue isntalling Google CSE on your Jekyll blog. If I have missed something, please suggest on the comment section.
Thanks for reading!
