
10+1 Step to get free domain email using ZOHO
,
Owning a domain is easy but owning a custom email account in the domain name is not. Now with ZOHO it is easy to obtain a free domain email. Learn how to setup a domain email free with ZOHO.
In a way, it was easy to handle all the emails from one place but my inbox started to clutter with spam. It is a headache to cleanup inbox every time I was bombarded with spam emails.
Read: How to secure email address
- How to set up a free domain email?
- Step 1: Log in to ZOHO
- Step 2: Select Package
- Step 3: Add Domain
- Step 4: Confirm Details
- Step 5: Verify Domain Ownership
- Step 6: Obtain CNAME details
- Step 7: CNAME set up for ZOHO
- Step 8: Verify CNAME
- Step 9: MX records for sending and receiving mails
- Step 10: Success!
- Final step ( I swear) : Email forwarding
Another thing that matters is credibility. Let’s say you have a domain called truejewels.in where you sell jewelry online and you are using an email, john321@gmail.com along with it. When you send an email to a customer about the confirmation of an order with this email id, do you think they trust you that you are from Truejewels?
What if your email id was john@truejewels.in? That gives the customer an affirmation that you really are associated with Truejewels. I’m going to give you a tutorial where you can get a free custom domain email by ZOHO. You will get a fully functional email setup.
The best part about ZOHO mail is that you don’t always have to login to the mailbox to check the mail. You can simply setup forward to get them in your personal email.
How to set up a free domain email?
Since we are using ZOHO for setting up a free custom email, it is necessary to have an account in ZOHO. While you sign up with ZOHO use a gmail account if you have one. I will explain why in the Tips section.
Step 1: Log in to ZOHO
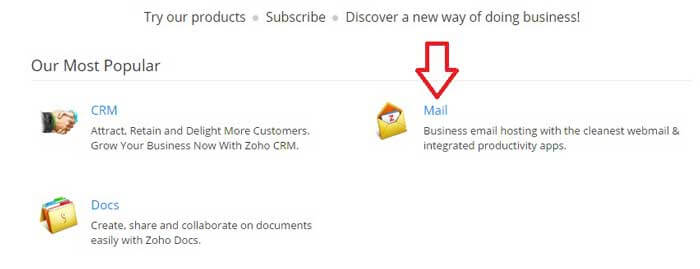
After signing up and verifying the email they send, go to ZOHO home page and click on mail.
Step 2: Select Package
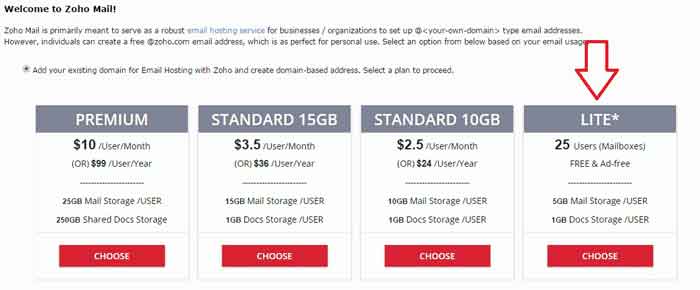
Select the LITE plan by clicking on Choose button below it. LITE is the free package among all the packages.
Step 3: Add Domain
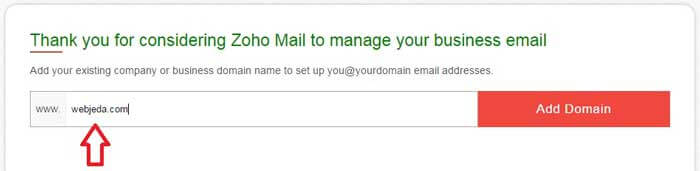
Enter the domain you own in the input field where it says Add Domain.
Step 4: Confirm Details
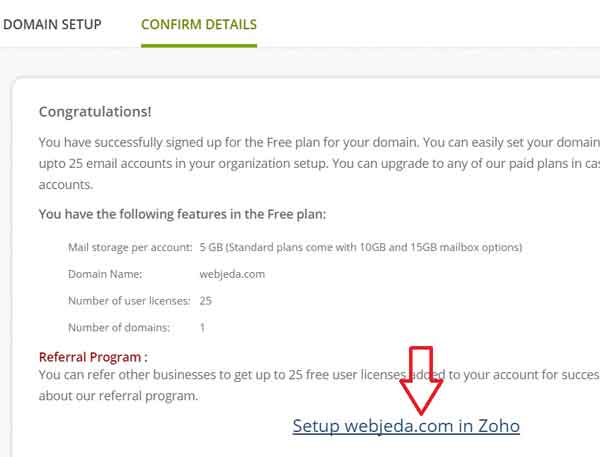
You will be redirected to Confirm Details page where you have to click on Setup yourdomain.com in ZOHO
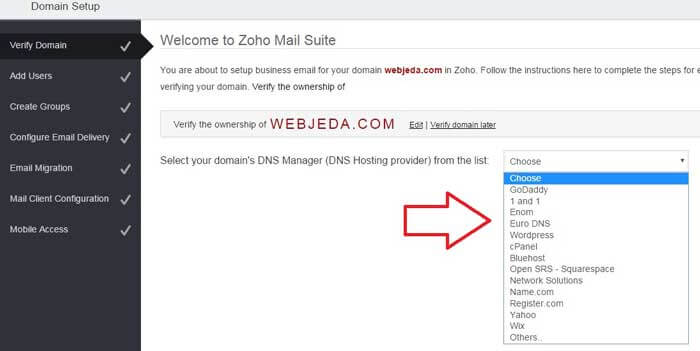
Step 5: Verify Domain Ownership
This is the crucial part where you have to verify your ownership of the domain. Select your domain registrar from the drop-down menu. If you don’t see your registrar in the list, then select others.
Step 6: Obtain CNAME details
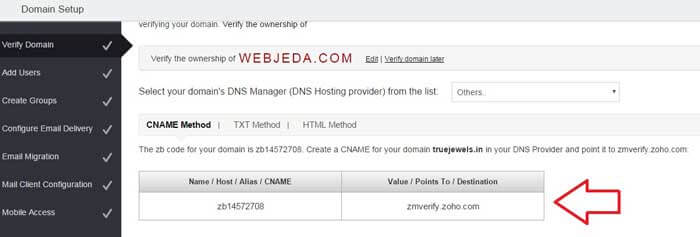
Once you select your option (in my case it was others) you should see a table with Name and Destination.
Step 7: CNAME set up for ZOHO
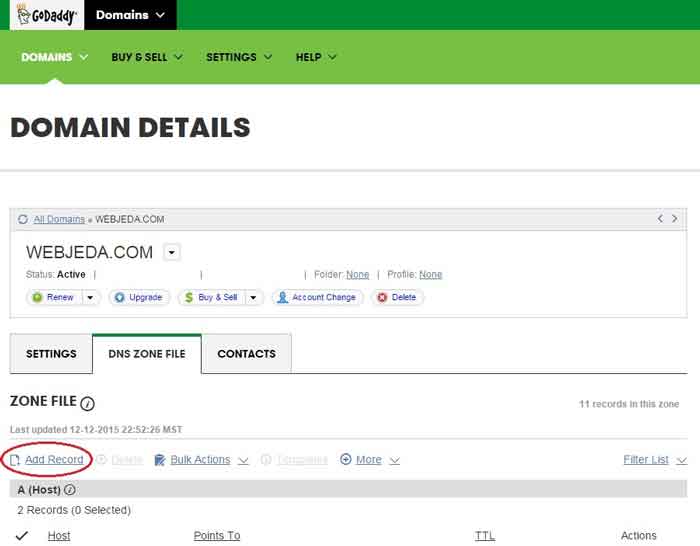
Now in a new tab log into your registrar (in my case GoDaddy), Click on Add record **. Now in ZOHO tab, copy the Name value which is similar to zb14572708 and Host value zmverify.zoho.com and paste them in respective inputs inside **Godaddy add zone record form, click Finish.
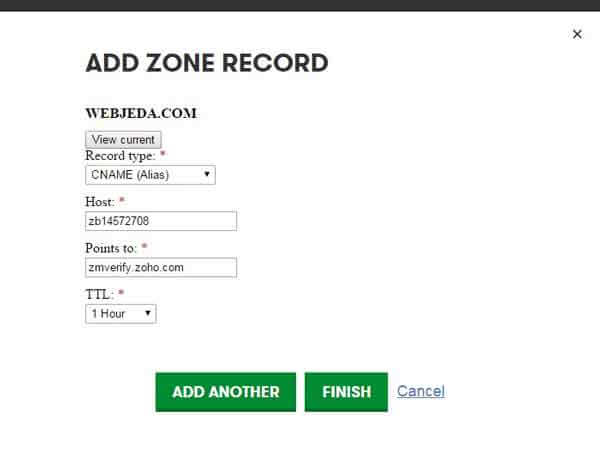
Finally click on Save changes. Do not close the window yet, we need it for Step 9
Step 8: Verify CNAME
Now come back to the ZOHO Domain Setup tab and click on the Verify CNAME button which will be at the bottom of the page. If not successful then give it some time. You should see the below message once you successfully verify your domain.
Step 9: MX records for sending and receiving mails
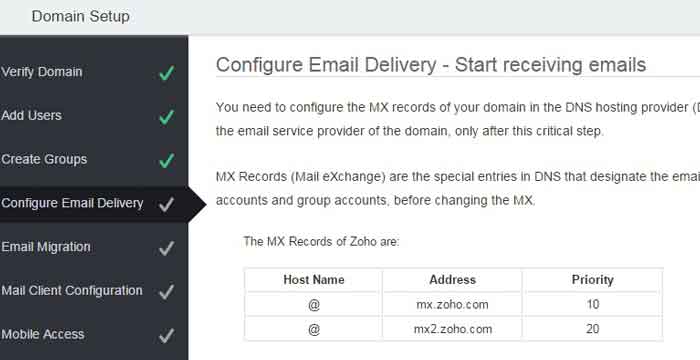
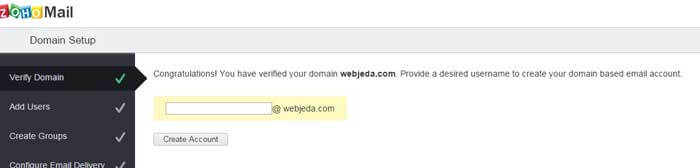
You are not done yet. Once you choose a username, skip to Configure Email Delivery. You should see a table with MX records.
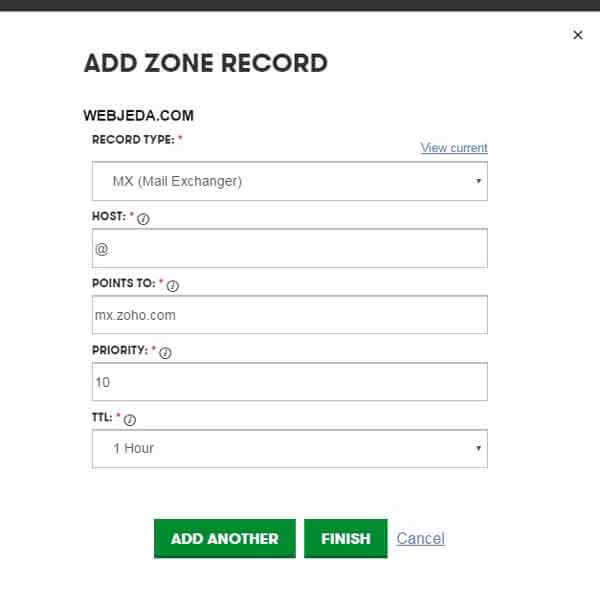
Now we have to enter these Mail Exchange records in our registrar. Use the same procedure as you did in Step 7 but this time, select Add record >> MX. There are two records to be added. That is for redundancy I guess.
Step 10: Success!
You are good to access your emails in ZOHO mail. You can send and receive emails to this mailbox. Check if it is working by sending a mail from a different email account and once you receive it, reply to the mail. If everything is working fine then go to the next step.
Final step ( I swear) : Email forwarding
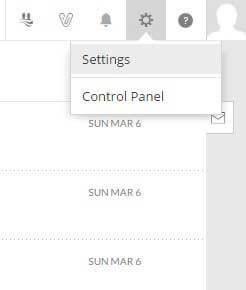
It is hard to always login to ZOHO mail and check for emails. A better way is to get the emails received by ZOHO to your personal mail. This is pretty easy. Once you login to ZOHO mailbox, click on gear icon at the top-right corner. Then click on settings.
Carefully look for Email forwarding and POP/IMAP and click on it. It will open up email forwarding page.
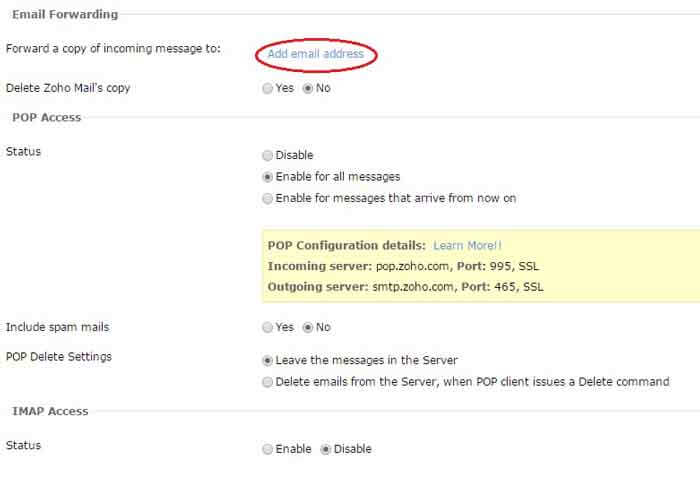
Now add your personal email and verify with the email they send to your personal email. Now you are done with ZOHO email setup!
Only one free domain email can be set up with ZOHO. What if you own many domains? Well, you can take a glance at Tips but I don’t recommend it.
Tips
What if you want custom email for multiple domains? If you sign up to ZOHO with a gmail id say, john@gmail.com then you can also sign up for another account with j.ohn@gmail.com. Because Google considers both the addresses to be the same but not ZOHO! So with one gmail account, you can sign up many accounts! Thank me later
This is how we can create free domain email with ZOHO. If you liked this article then hit like on my facebook page.
Thanks for reading!
