
13 Tested ways to Speed up Jekyll Blog
,
Page speed is one of the factors in Google’s search ranking algorithm. Learn how to speed up Jekyll blog by various methods that help website load faster on a mobile device even on a 2g connection!
Why page speed is important?
It is a website, not an F1 racing car! Then why should we try to optimize it for speed? Well, there are plenty of reasons to speed up our Jekyll blog. The main one being user experience.
A typical user of the 21st century doesn’t want to waste his/her time staring at a blank page for more than 5 seconds. I’m pretty sure that your website loads within that time frame but, it may not happen in all conditions. Users may close the tab and never return to your website if it takes too long to load. Be cautious to keep the page loading speed within 2 seconds.
- Why page speed is important?
- Is your Jekyll blog fast enough?
- How do I know whether my Jekyll site is slow?
- How to speed up Jekyll blog?
- 1. Keep JavasScript at the bottom of the page
- 2. Compress images
- 3. Minify Jekyll HTML, CSS and JS
- 4. Minimize http requests
- 5. Use a CDN to cache static files
- 6. Use image dimensions
- 7. Use SVG instead of JPEG
- 8. Lazy load css
- 9. Lazy load images using jQuery
- 10. Request only the required font
- 11. Adsense Script in Jekyll
- 12. Faster landing page
- 13. Use a minimal theme
- Conclusion
On April 2010, Google announced that they are including website speed as one of the signals in their search ranking algorithms. So for a better ranking in search engines, you should make your website load faster. And also for e-commerce websites, speed is very crucial. Let us look at some of the adverse effects of slow website load time.
1. One second delay in loading cost for Amazon is $1.6B sales each year!
2. A study by Walmart showed that every second of improvement in their website loading time would increase conversion by 2%.
3. In an average every second of delay in page loading time can result in 7% decrease in online sales.
For established businesses, speed is of grave importance. For small time bloggers like myself, it doesn’t make much of a difference but, I still care about my website ranking and user experience. A good way to stop users from going away from your website is to load visual content very fast! The style is important but it can wait.
If something loads then users’ waiting threshold increases. You may have seen preloaders on some websites which shows the progress. Pre-loaders can retain users for a few more seconds but not longer than that.
Loading...
This is how a simple pre-loader looks like. Don’t expect anything to load. This will keep spinning forever!
I will be using some of these technical terms here onwards.
Page Speed: Time taken by the content of a web page to load completely.
Time to first byte: Time taken to receive the first byte of information from the web server.
Async: JavaScript code is parsed and executed along with html without blocking.
Defer: JavaScript code is executed only at the end of parsing html and other resources.
Visible content (above the fold): The portion of a webpage users see on their screen before they scroll.
Minify: Process of removing all the unnecessary characters from source code.
Cache: A component that stores data so that it can be served faster. In the case of websites, it is browser cache.
Is your Jekyll blog fast enough?
If you have chosen Jekyll for blogging then you are already on the right track. A static website is very fast because it has a one-time communication with the server when it loads all the content. There is no interaction after the page is completely loaded. But in dynamic CMSs like WordPress, there is dynamic content loaded over time on user interaction resulting in a new request to the server on every interaction.
This to and fro information flow takes time and thus makes the website slower. But dynamic sites have many advantages over static sites. Imagine signing up for a service, say gmail. Every single detail you enter is fed to the server right away and checked if it is valid. If you enter a username which is already taken then google will let you know right then by checking its database. All these queries establish a connection which takes time but, sometimes there is no way around it.
Though Jekyll sites are fast, it slows down depending on the configuration and content. There are few rules mentioned by Google Page Speed that gives you an idea on how to optimize your website for faster loading but, it is for general websites. I will be discussing some methods exclusively for Jekyll through which you can optimize your blog.
How do I know whether my Jekyll site is slow?
Website loads faster on an LTE connection than on a 2g connection. So in order to know the exact page speed and how well it is configured for performance, go through these online tools.
GTmetrix: GTmetrix is a page speed testing tool which provides pretty decent data with a cool UI. It provides crucial data on number of requests, minification status, possible optimization etc., In GTmetrix, my home page scores a whopping 99%!
Many speed testing sites will let you know that your CSS, JS, HTML are not minified, images can be compressed etc., but this website gives you the optimized files right away to use. I usually download fully compressed image suggested by GTmetrix and replace the original image to enhances the speed.
It also provides YSlow score and details on why your website is loading slowly. Another important feature is historical data. The website stores the result in a database and fetches with a graph when you click on History! I just love it. It has helped me keep a track on my website speed.

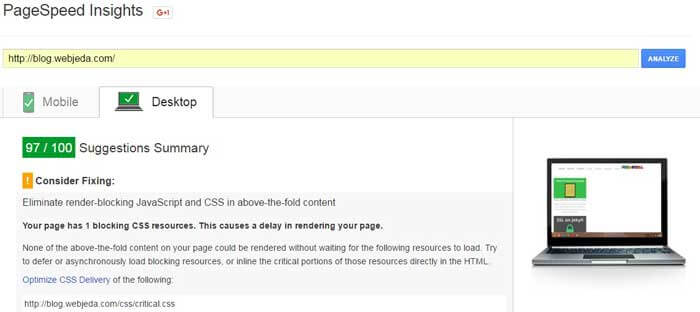
PageSpeed Insights: This is a free tool provided by Google. I prefer this because ultimately Google is the one who ranks my website based on speed. I rely on the results provided from PageSpeed more than any other tool. I minified my html content only after seeing a suggestion from PageSpeed.
WebPageTest: This is probably one of the best tools to find out what’s wrong with your site. It gives you the details on First View and Repeat View. This is good because when a website is loaded for the first time on a browser, it takes a lot of time since it is downloading all the resources for the first time. But, when you visit the website again on the same browser, it takes significantly less time.
A repeat visitor is served quickly than a new visitor. But, first visit should be fast enought to convert new visitor to a repeat visitor. Have you heard of first impression? That very much applies to websites as well.
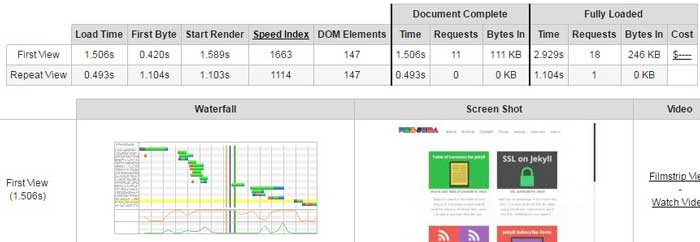
Thanks to browser cache which saves time and also bandwidth by caching static files on its cache memory. Web page loads really fast if it has cached few resources already. If your website gets repeated visitors then browser cache is very useful.
Now that you have tested you blog, see if these tests reveal something. See if they provide any suggestions. Based on those suggestions you can work on your blog and optimize it.
How to speed up Jekyll blog?
If the results from the check are not satisfactory then follow these steps to speed up to optimize Jekyll blog for speed.
1. Keep JavasScript at the bottom of the page
One thing we all developers collectively do wrong is keeping the script tags in the head tag. If that is the case then the browser shows a blank page till it downloads the complete script. If one of the downloads take too long then the page load time increases significantly.
Keeping <script> tags at the end of the page will not block the parsing of html. If you want the script to be loaded along with html then use async attribute.
2. Compress images
Many times we do not give attention to the images we use. I used to use images of high dimensions and resize it using height and width attribute. But the image used to weigh 50kb or more which is not practical for speed optimization.
Always crop images to the exact size required instead of resizing it using html or css. This reduces the file size and hence page load time.
Along with this, you can use photoshop to optimize images for the web. An option called Save for web helps to reduce the file size significantly. If you are not good at photoshop do not own a copy then use this online tool called Tinypng which does the same job.
3. Minify Jekyll HTML, CSS and JS
Minifying is another way to reduce file-size which results in fast loading of websites. Minifying removes any character or space that is unnecessary. Many times we use comments in the code for our convenience. But, this is not required for an end user. Here are few things you can do to achieve minification.
Html: Minifying Jekyll html is very easy. A pure liquid layout is available which takes care of html minification. Read How to minify Jekyll html
Css: Minifying css is necessary if you are using a lot of styling. A typical website uses more styling than JavaScript. Minifying css reduces the file size drastically. Read How SASS works in Jekyll
If you do not know SASS then you can use this trick which does the same job.
Rename all the .css files into .scssand place them in a folder _sass. You have to create one of you do not have it already. It should look something like this.
.
.
├── _sass
|   ├── css-1.scss
|   └── css-2.scss
-
Make a folder called
cssin the root and create a file and name itmain.scss -
Copy the below code inside
main.scss
---
# Only the main Sass file needs front matter (the dashes are enough)
---

// Import partials from `sass_dir` (defaults to `_sass`)
@import
        "css-1",
        "css-2"

;
Once the Jekyll renders the page, a main.css file is created inside the css folder. You can observe this if you are using Jekyll locally. It will be present inside _site folder.
What this process does is, combines both css-1 and css-2 into one main css file which is minified! I have shown for only two css files but you can use any number of files inside _sass folder. Make sure you import it in the main.scss file.
If you want the main.css to be minified by default then use the below snippet inside _config.yml file.
sass:
    style: compressed
JavaScript:
If you are loading JavaScript from a CDN then make sure you use the .min.js version. That is the minified version. To minify local JS code I use Closure Compiler by Google which I have been using for a log time with satisfactory results. Here is a guide on how to use it.
4. Minimize http requests
Every request a webpage makes will take a considerable amount of time in establishing a connection and retrieving data. We can use some techniques to reduce the number of requests.
Use Data-URI instead of images: Every image in a website is generally loaded using a http request. In order to avoid this, an image can be converted into base-64 code which looks like this.
data:image/jpeg;base64,/9j/4AAQSkZJRgABAQAAAQABAAD/2wBDAAYEBAQFBAYFBQYJBgUGCQsIBgYICwwKCgsKCgwQDAwMDAwMEAwODxAPDgwTExQUExMcGxsbHB8fHx8fHx8fHx//2wBDAQcHBw0MDRgQEBgaFREVGh8fHx8fHx8fHx8fHx8fHx8fHx8fHx8fHx8fHx8fHx8fHx8fHx8fHx8fHx8fHx8fHx//wAARCAAFBkADAREAAhEBAxEB/8QAGQABAAIDAAAAAAAAAAAAAAAAAAUGBAcI/8QAFBABAAAAAAAAAAAAAAAAAAAAAP/EABkBAQADAQEAAAAAAAAAAAAAAAAEBgcDBf/EABQRAQAAAAAAAAAAAAAAAAAAAAD/2gAMAwEAAhEDEQA/AIVcVIAAAAAAAAAAAAAAAAAAAAAAAASzO0AAAAAAAAAAAAAAAAAAAAAAAABhvecQAAAAAAAAAAAAAAAAAAAAAAAEYsbbQAAAAAAAAAAAAAAAAAAAAAAAFGV9UgAAAAAAAAAAAAAAAAAAAAAAAHWiIkAAAAAAAAAAAAAAAAAAAAAAAAK0xxoYAAAAAAAAAAAAAAAAAAAAAAADUK/J4AAAAAAAAAAAAAAAAAAAAAAAD//Z
If you are wondering what this is, then copy the code and paste it into your browsers address bar. It is actually the small footer bar I have used on this website which will look like the image below.

So in the place of src attribute in a <img> tag, you can use this data URI which doesn’t make a request for the image as it is the image available right there. But, these base-64 codes are lengthy! It is hard to handle anything lenghthy while coding. Remember, this will not reduce the file size of the image. And be cautious not to remove even single character out of the URI.
I was worried that the data URI format image will not be cached but my Chrome browser saves it in the cache. Let me know if you think it doesn’t.
Currently, I have replaced small images with data-URI and saved some http requests. Use it and let me know whether it helped your website to load faster.
Use CSS sprites:
![]()
This is another cool way to reduce the number of http requests. Css sprites combine many images into a single sprite sheet. Then css is used to show any particular image from the bunch using background-position. This way, there is only one request is made to fetch all the images.
A tool like CssSprites can be used to create sprite sheets. It will also provide the style for every image that you want to display.
This works best for small images like social media buttons. Do not use this for large images as it might take a long time to load the sprite sheet.
Inline small CSS or SCSS:
If you keep multiple css files then multiple http requests are needed to load them. Instead, if one of your css is really small, then you can inline it by placing inside <style> tag.
If you have a .css file then it is easy to inline in the head tag by keeping the css file inside _includes folder and using the code below.
 <style>
{% inclide critical.css %}
</style>
But, if you have a .scss file the process to inline scss is a little different. You have to keep the scss file inside the _includes folder as usual but you should use the code given below.
  <style>
          {% capture include_to_scssify %}
          {% include critical.scss %}
          {% endcapture %}
          {{ include_to_scssify | scssify }}
  </style>
Info
I use two css files. One is critical.css which only has important styles that are required in the beginning like page width, content width etc. This file loads immediately as I have declared it in the head tag. I have all other styles combined in a minified css file called main.css which is configured for lazy loading.
5. Use a CDN to cache static files
CDN stands for Content Distribution Network which delivers content through a server close to the end user and thus reducing the time required to fetch content. Google uses servers located in India in response to a request made by an Indian user.
I use CloudFlare, which is a free CDN with plenty of features. I have explained the CloudFlare setup in this article.
6. Use image dimensions
Using height and width attribute will help the browser to display a page without any reflow. If you do not specify any resolution then the browser will have no idea what size the image is until the image is completely downloaded. This causes a small delay but, if you have more images without dimensions specified then it might lead to a significant delay in page load time.
If you observe the images I have used in this post, all of them have specified dimensions. Specifying dimensions in a normal html website is easy.
<img src="/path/to/some-image.jpg" width="400px" height="300px">But for markdown, we have to use other ways since we cannot use tags in markdown. I always wondered how to resize images on markdown. I found some answers that work and some that dont.
For Kramdown
{:width="400px" height="300px"}For other markdown processors
I havent tested it on other processors but they should work. Please let me know if this doesn’t work for you or you have other ways to do it.
7. Use SVG instead of JPEG
SVG stands for Scalable Vector Graphics. An svg image can be scaled to any size without losing quality because it uses ponts instead of pixels. SVG can be used for images with very few details. Images like logos buttons etc., can be converted into SVG. Bigger images can also be converted to SVG but there can be a drastic increase in the filesize. But for images with simple lines, rectangles and other shapes we can use SVG.
The best example for using SVGs successfully in a website is varvy.com. Patrick Sexton has used Adobe Illustrator to create some wonderful SVG images that are very light-weight and scalable.
SVGs are basically xml which means that they are made up of few tags and can be edited using a text file. We can also perform lossless compression on them to reduce the size. So SVG has a big advantage over PNG, JPEG etc., An example of such an advantage is given below. I have created two images here. One is a compressed SVG image and the other is a JPEG image optimized for web.

Both images look the same but there is a huge difference in their size. The first SVG image is around 1KB but the second JPEG image is of the size 14KB!
This is a amazing; isn’t it? I’m pretty impressed by this improvement. I’m thinkin of using more SVGs in my posts. Webjeda logo is already an SVG. The main advantage is that it doesn’t look pixellated on big screens. Open them in new tab to see how SVGs don’t loose their quality even if you zoom in but, JPEG images become pixellated.
If you do not use Adobe Illustrator, then you can use Sketch(for mac) or Drawsvg for online SVG creation. Once you create an SVG, make sure you optimize it using SVG optimizer which reduces the size a little bit.
8. Lazy load css
Loading a big css file in the header may result in a blank page for few seconds. In order to avoid this, we should load big files in the end and prioritize visible content. Css files like font awesome, web-fonts can be loaded at the end instead in the head tag.
I have written a detailed tutorial on how to lazy load css which can be used on any website.
9. Lazy load images using jQuery
Jquery can be used to lazy load html, especially images. This method will prioritize above the fold content which is visible in the viewport. All the content below will be loaded only upon scrolling. You can also add effects like fade-in that makes it pretty!
Here is a guide on how to use jQuery lazy loading. And here is a sample website which uses this feature.
This feature comes in handy if your website has a lot of images or other similar content. This can be used on any type of media.
10. Request only the required font
If you are using Google fonts, then load only the required font variation. If you want Open sans font for your paragraph text then do not select Extra-Bold or Light variations. All you need is the Regular style.
If you are using Bootstrap or Fontawesome then delete whatever you don’t use (keep a backup file though). Read: How to reduce fontawesome to 10KB!

Google actually has a scale on the right side showing how page load increases on selecting more variations of the font. More types you select heavier the font css becomes which in turn increases the page load time.
11. Adsense Script in Jekyll
If you are using multiple blocks of ads on your website then avoid repeatedly using the Adsense script tag. You just have to declare the below script tag once. You can use any number of ads (but, Google suggests a maximum of 3 ads/page).
<!--   Adsense Script  -->
<script async src="//pagead2.googlesyndication.com/pagead/js/adsbygoogle.js"></script>
12. Faster landing page
A post layout in Jekyll will have a lot of things stuffed in. It has the content, it may have a third party comment box, ads, social media share bar, Jquery and what not. So loading all these resources obviously take time. There is always a minimum overhead present for posts.
But, a landing page(Home page) should be really fast. Because in blogs, the home page is where people find the list of posts and they usually browse through it to find the content they are looking for. If the post index itself takes a lot of time then they hope worst for individual posts. So make sure you keep your home page fast and clean.
Load only things that are necessary for a home page. For example, loading AdSense code on home page layout is not necessary if you are not showing any ads there.
13. Use a minimal theme

I’m kind of promoting my themes here. Use Thunder theme for a real fast loading website. It looks fairly good and loads super fast. The reason is that it is a slim version of default Jekyll theme.
I have added some things to make it look attractive but all those rings and bells are really light. Go ahead and try it. I have created another theme called Purple which is also minimal.
If you want a site which loads really fast on mobile phones then try Amplify. Amplify is a theme developed following Google Accelerated Mobile Pages(AMP) rules. AMP is a project by Google to make websites load faster on mobile devices. Anyone can create an AMP version of their website. But we have a Jekyll theme which is completely AMP based! Here is a sample post which loads incredibly fast.
So these are the methods I would recommend to use to speed up your Jekyll blog. Once you implement some of these methods, check if it has improved the page load time.
Conclusion
More than ranking on search engines, speed is important to keep your users happy. They may not return to the website if it is too slow to load. Make sure you keep your website light and fast. Compare your website to a restaurant; how happy we feel if the service is quick and how frustrating it will be if the order takes forever. It is easy to differentiate a Jekyll site from a WordPress site just by its page speed! This is one of the reasons why I chose Jekyll over WordPress.
I hope that the article helped you speed up your Jekyll website. Ask any doubts you have through comments.
Thanks for reading!